Vendors & Suppliers
Vendors & Suppliers gives your team one directory for the wholesalers, material yards, rental houses, subcontract supply partners, and specialty vendors you buy from during day-to-day work. Use it to keep account numbers, contacts, payment terms, lead times, and preferred supplier status easy to find before a job gets delayed by missing parts.
When to use this
Use Vendors & Suppliers when your office or field team needs a shared supplier list instead of personal phone contacts, spreadsheets, or old invoices. It is especially useful when dispatchers, estimators, and technicians need to know who carries a part, which vendor is preferred, and how much lead time to expect.
Before you start
- Confirm the plugin is included in your plan.
- Open Settings → Features and make sure Vendors & Suppliers is enabled.
- Decide who can add, edit, suspend, or delete vendors. Most teams limit this to owners, office managers, purchasing leads, or inventory managers.
- Gather the first supplier records you want available: company name, trade, category, contact info, account number, payment terms, lead time, and notes.
How to use Vendors & Suppliers
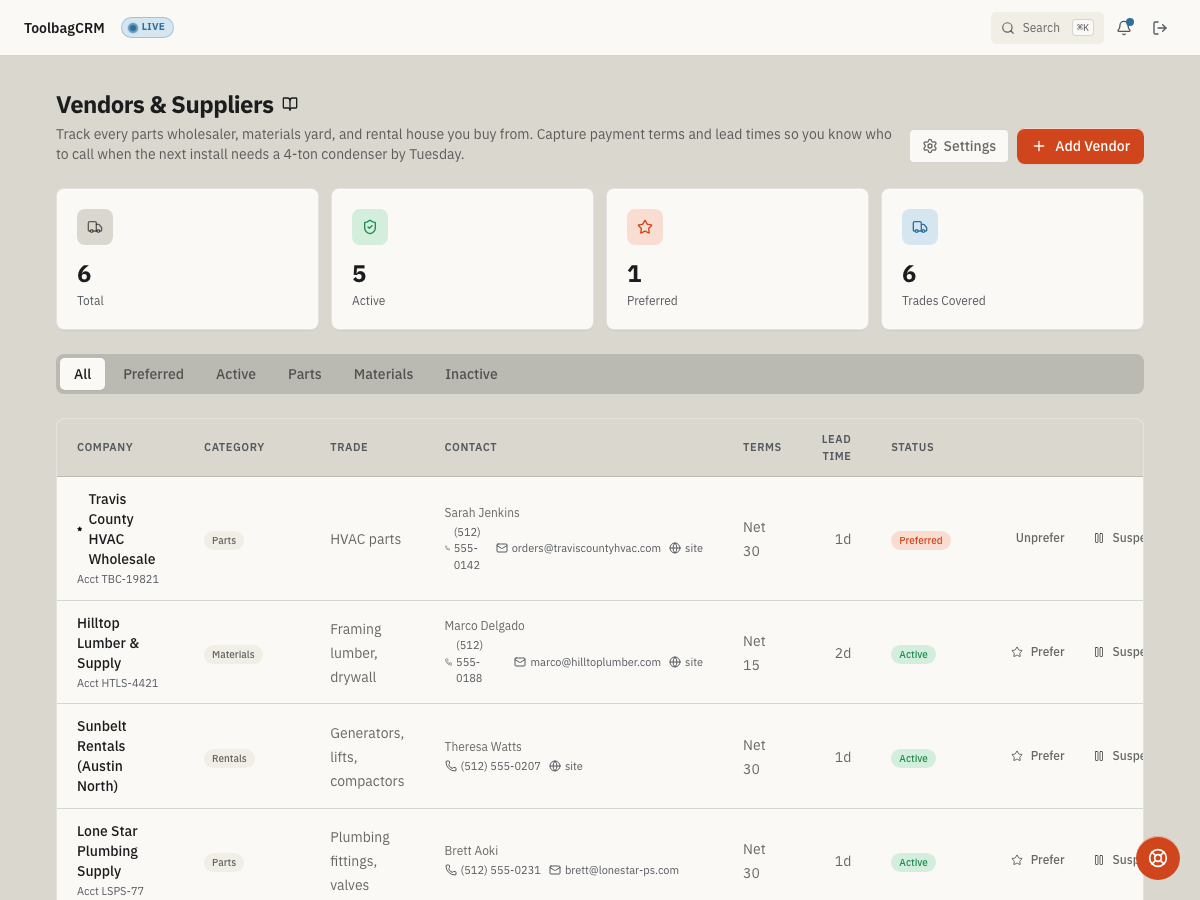
Open Vendors & Suppliers from the main navigation. The page shows supplier summary cards, status/category tabs, and the vendor table or empty state. Use the tabs to focus on preferred vendors, active suppliers, parts vendors, materials vendors, or inactive records.
- Click Add Vendor.
- Enter the vendor Company and optional Primary Contact.
- Add phone, email, website, and address details your team uses to place orders or request quotes.
- Choose a Category such as Parts, Materials, Tools, Rentals, Services, Subcontractors, or Other.
- Add the vendor's Trade, Account #, Payment Terms, and Lead Time (days).
- Set the starting Status. Use Preferred for go-to suppliers, Active for normal suppliers, and Suspended or Inactive when a supplier should not be used for new work.
- Add notes such as pickup rules, after-hours contact details, warranty process, or order cutoff times.
- Click Add Vendor.
After vendors exist, use the row actions to Mark preferred, Suspend, Reactivate, or Delete a vendor. Suspending a vendor is safer than deleting when you want to preserve history but stop the team from using that supplier for new work.
Settings
Open Vendors & Suppliers → Settings from the page header. Vendor defaults control the values ToolbagCRM applies when someone creates a new supplier and leaves those fields unchanged.
Recommended setup flow:
- Set Default payment terms (net days) so new vendors start with the most common payment term, such as Net 30.
- Set Default lead time (days) to match the normal supplier turnaround your team expects.
- Choose the Default category your team adds most often, such as Parts, Materials, Services, or Subcontractors.
- Click Save changes.
These defaults do not overwrite vendor-specific details. If a supplier has its own terms, lead time, or category, edit that vendor record directly.
What to keep current
Review your supplier directory whenever your buying process changes. Keep payment terms, lead times, account numbers, preferred status, and pickup notes current so dispatchers, estimators, and technicians can make purchasing decisions without checking old invoices or personal contact lists.
Tips
- Keep preferred status meaningful. If every supplier is preferred, technicians lose the signal.
- Use categories and trades consistently so office staff can quickly find the right supplier for the job type. Put labor partners in Subcontractors when they are hired outside companies rather than W-2 team members.
- Record account numbers and payment terms before field users need them during an urgent job.
- Add notes for cutoff times, delivery windows, special-order rules, and after-hours pickup processes.
- Suspend outdated suppliers instead of deleting them if your team may need historical context later.
Troubleshooting
Search returns no results
Search matches against company name, trade, category, and status. Try a shorter search term or switch to the All tab to remove the status filter.