Scheduling
Scheduling lets you plan, assign, and track field visits tied to your jobs and customers. Create visits, assign team members, and see your day at a glance in a chronological list.
Open Scheduling from the main navigation after enabling the plugin in Settings → Features.
When to use Scheduling
Use Scheduling when your team needs to:
- Assign jobs to specific time windows and team members.
- See what is scheduled today, tomorrow, or on a future date.
- Track visit status from scheduled through completion.
- Set business hours and configure scheduling defaults.
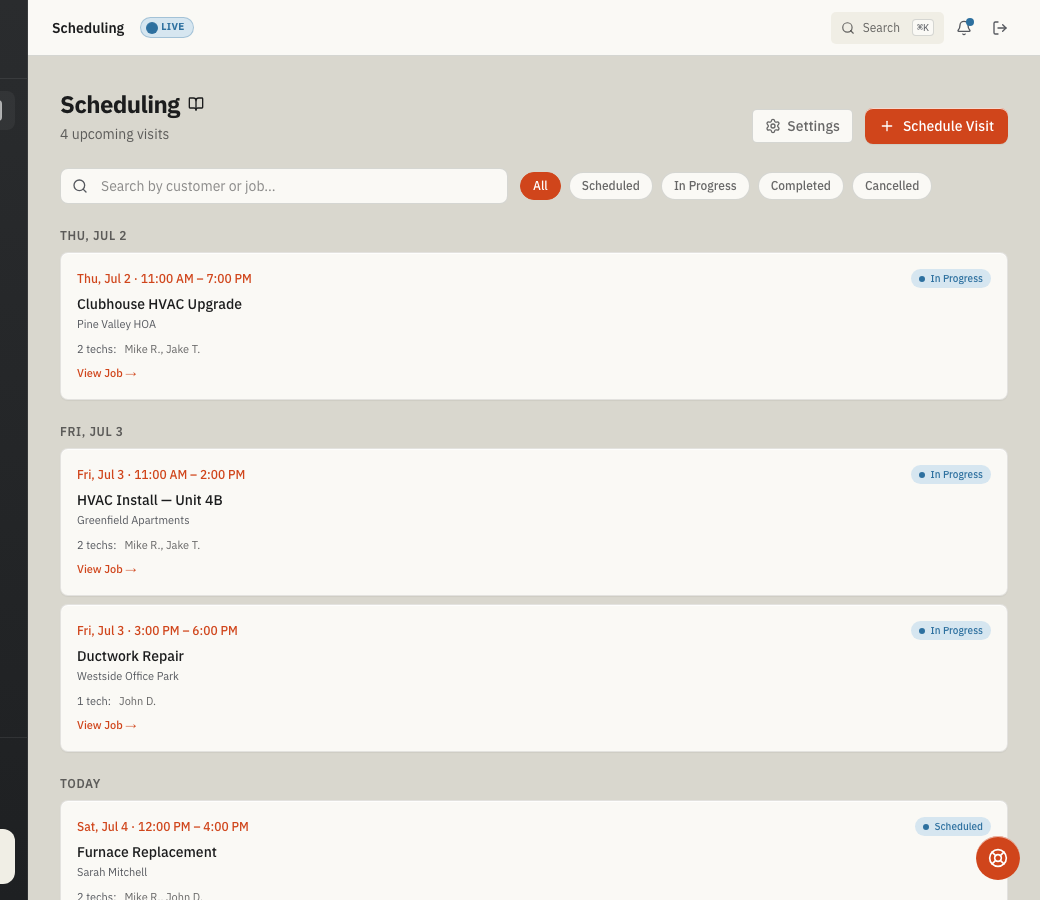
The visit list
The visit list shows all visits sorted chronologically and grouped by date. Date headers display "Today," "Tomorrow," or a formatted date like "Mon, Jun 15."
Search and filter
- Search bar — filter by customer name or job title.
- Status filter pills — toggle between All, Scheduled, In Progress, Completed, or Cancelled.
What each visit card shows
- Time range — start and end time for the visit.
- Status badge — color-coded: Scheduled, In Progress, Completed, or Cancelled.
- Job title — the work being done.
- Customer name — who the visit is for.
- Assigned team — "N techs: Name1, Name2" when team members are assigned.
- View Job link — navigate to the job detail page.
When there are no visits (or no results match the filter), an empty state appears with a button to schedule one.
Schedule a visit
- Click Schedule Visit. You can also click Schedule Visit from a job detail page or the job edit sheet; Scheduling opens the dialog with that job already selected.
- Select a Job from the dropdown (required). The customer and service location are resolved automatically from the job, so the visit stays attached to the right account and work site.
- Set the Start date and time (required).
- Set the End date and time (required).
- Assign Team members by clicking their name in the multi-select toggle (optional).
- Add Notes such as access instructions, gate codes, or safety concerns (optional).
- Save the visit.
The "Schedule" button is disabled until Job, Start, and End are all filled.
Visit statuses
Visits follow this status flow:
- Scheduled — Planned but not yet started.
- In Progress — Work is actively underway.
- Completed — Visit is finished.
- Cancelled — The visit will not proceed but stays on record.
Settings
Open Scheduling → Settings from the page header to configure scheduling defaults and policies.
Visit defaults
| Setting | Description | Default |
|---|---|---|
| Default visit duration | Length of a new visit when no end time is given (5 minutes to 24 hours) | 60 minutes |
| Default visit status | Status a new visit starts in | Scheduled |
Business hours
| Setting | Description | Default |
|---|---|---|
| Opens | Business hours start time | 08:00 |
| Closes | Business hours end time | 17:00 |
| Business days | Days the business operates (toggle each day) | Mon – Fri |
Routing and policy
| Setting | Description | Default |
|---|---|---|
| Travel buffer | Minutes reserved between visits for travel (0 to 480 minutes) | 0 |
| Allow double-booking | Whether overlapping visits are permitted for the same team | Off |
Before you start
- Scheduling must be enabled in Settings → Features before the page appears in navigation.
- Jobs must exist — each visit is tied to a job, so create jobs (and their parent customers) first.
- Team members should be active in Team settings if you want to assign techs to visits. Only active members appear in the assignment picker.
- Business hours and visit defaults can be customized in Scheduling → Settings, but the defaults work well for most teams.
Tips
- Set business hours so the schedule reflects when your crews actually work.
- Use the travel buffer to prevent back-to-back visits when techs need drive time.
- Schedule from the job detail page when you are already reviewing the work order. The Scheduling page receives the job context and keeps the visit tied to the right customer and service location.
- Add notes to visits with access instructions, parking details, or safety concerns.
- Check the visit list at the start and end of each day so work does not fall through the cracks.
Troubleshooting
The Schedule button is disabled
The Schedule button stays disabled until Job, Start, and End are all filled in. Make sure you have selected a job from the dropdown and set both date/time fields.
The page says the plugin is disabled
Open Settings → Features and enable Scheduling. Only administrators can change feature toggles.
Double-booking conflict when saving a visit
If Allow double-booking is off in Scheduling → Settings, the system blocks overlapping visits for the same team member. Adjust the visit times or turn on the double-booking setting if your workflow requires it.
Jobs dropdown is empty or shows a loading error
Visits require a linked job. If the Job dropdown shows "Loading jobs…" or an error, make sure you have at least one job created under Jobs. Reload the page if the list fails to load.
Team members are not appearing in the picker
Only active team members show in the visit assignment toggle. Check Team settings to confirm the member is marked as active.