Parts & Inventory
Parts & Inventory helps your team track stocked materials, consumables, and parts across warehouses, trucks, and job sites. Use it to know what is on hand, where it is stored, and when an item is getting low before a job is delayed.
When to use this
Use Parts & Inventory when your company stocks parts or materials that technicians consume on jobs, such as filters, fittings, valves, chemicals, fasteners, or replacement components. It is most useful when office staff and field teams need one shared place for item details, stock locations, reorder levels, and stock movement history.
Before you start
- Confirm the plugin is included in your plan.
- Open Settings → Features and make sure Parts & Inventory is enabled.
- Decide who can add items, create locations, and record stock movements. Most teams limit setup to administrators or inventory managers.
- Gather the first set of SKUs, names, units, costs, vendors, and reorder levels you want to track.
How to use Parts & Inventory
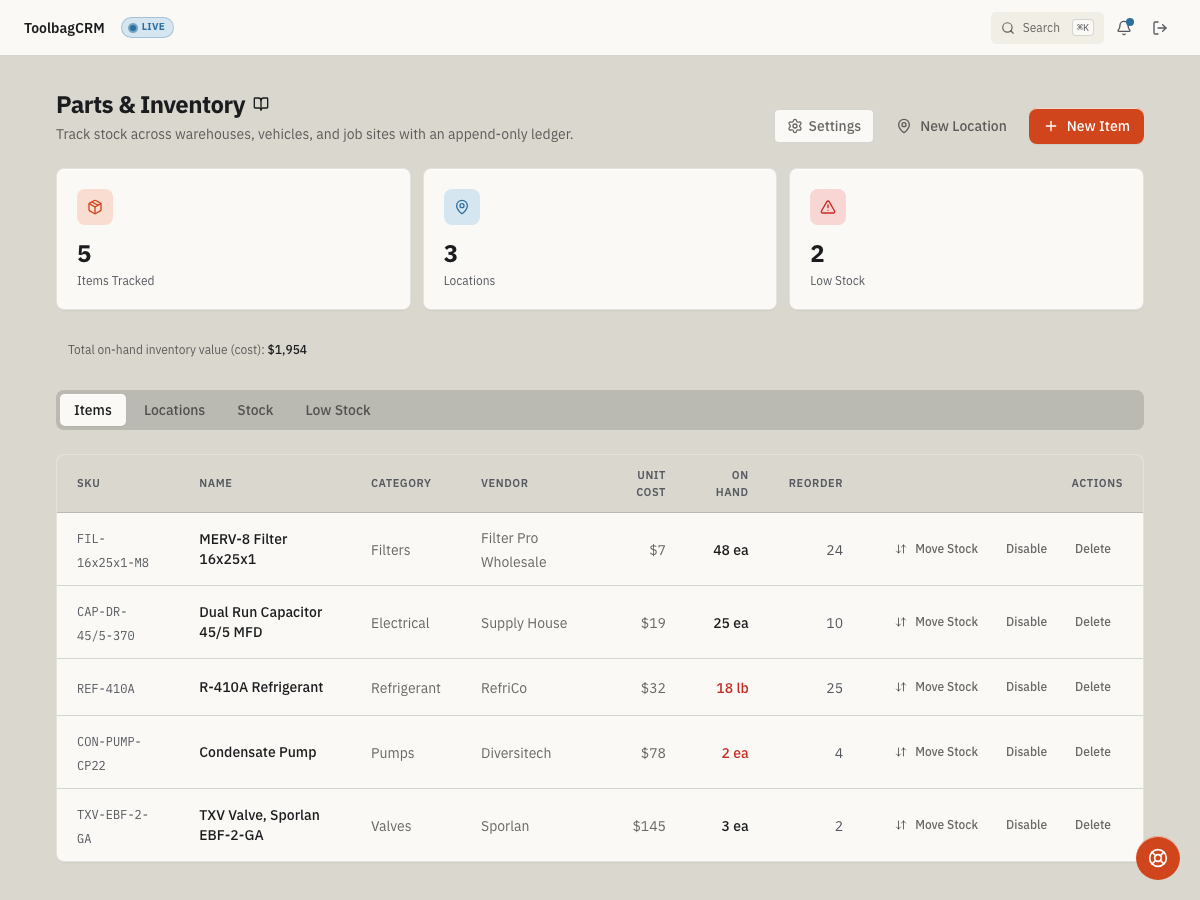
Open Parts & Inventory from the main navigation. The page shows summary cards for items, locations, and low-stock alerts, plus tabs for Items, Locations, Stock, and Low Stock.
Add an inventory item
- Click New Item.
- Enter the item SKU, Name, and Unit such as
ea,ft, orgal. - Add an optional description, Unit Cost, Category, and Vendor.
- Set Min Reorder Level so the item appears on the Low Stock tab when stock falls below that amount.
- Click Create Item.
Add stock locations
Create locations before recording movement so ToolbagCRM knows where stock lives. Locations can represent warehouses, vehicles, job sites, or other storage areas.
- Click New Location.
- Enter a clear location name, such as
Main warehouseorTruck #3. - Choose the location kind.
- Click Create.
After items and locations exist, you can record stock movements from two places:
- Manage Stock on a location row — shows current stock at that location and lets you receive or adjust quantities without leaving the Locations tab.
- Move Stock on an item row — receive, use, adjust, or transfer quantities for a specific item.
The Stock tab shows all on-hand quantities by location, and Low Stock highlights items that are below their reorder level.
Manage stock from a location
The Locations tab shows an Items Stocked column so you can see at a glance how many items have stock at each location. To record stock movements for a location:
- Go to the Locations tab.
- Click Manage Stock on the location row.
- The modal shows a table of items currently stocked at that location with their quantities.
- Choose an Item, enter a Quantity, and select a transaction type: Receive, AdjustUp, or AdjustDown.
- Optionally add Notes to explain the adjustment.
- Click Record.
The Manage Stock button is disabled if no active items exist yet — create at least one item first.
Settings
Open Parts & Inventory → Settings from the page header. Use setup to define defaults for new inventory items and low-stock notifications:
- Set the default reorder level for items that do not have their own threshold.
- Set the default unit your team uses most often, such as
ea,ft, orgal. - Optionally set a default stock location so the Move Stock dialog preselects the right location.
- Turn on low-stock alerts and add the email recipients who should be notified.
- Click Save changes.
What to keep current
Inventory stays useful when the office and field teams trust the quantities and item details. Review these areas regularly:
- Item names, SKUs, units, and vendors so technicians can pick the right part quickly.
- Minimum reorder levels for seasonal or high-volume materials.
- Truck, warehouse, and job-site locations when storage areas change.
- Low-stock alert recipients so the right person sees replenishment warnings.
- Inactive or discontinued items so old parts do not clutter day-to-day searches.
Tips
- Start with high-volume or high-cost items before entering every part your company buys.
- Use consistent SKUs and units so stock counts, job materials, and purchasing workflows stay clean.
- Create truck or warehouse locations that match how your team actually stores materials.
- Use Manage Stock on the Locations tab when you are working by location — for example, restocking a truck or auditing a warehouse. Use Move Stock on the Items tab when you are focused on a specific part.
- Review the Low Stock tab regularly and adjust reorder levels after you learn the right thresholds.
- Disable or archive old items instead of deleting them if your team may need historical stock context later.
Troubleshooting
Quantities do not match physical stock
Inventory quantities update when items are received on purchase orders, consumed on jobs, or adjusted manually. Review the item history for recent transactions before making a manual adjustment.
Manage Stock button is disabled on a location
The Manage Stock button is disabled when no active items exist. Go to the Items tab and create at least one item, then return to the Locations tab. If all items are inactive, reactivate or create a new item before managing stock.